I used to have the rule that every time Apple launched a major new operating system, I’d do a clean install – wipe my hard disk, put a fresh system on it, laboriously reinstall my apps and copy my data back across. Even if not strictly necessary, this was a reasonable policy in the days when Apple’s release schedule was infrequent, and when each release made big under-the-hood changes, but the now-annual cycle allied to the robustness of the core OS and the upgrade-in-place process has meant that since around 10.7 I haven’t done it. I think I’m due; Yosemite is acting up in small but significant ways on my trusty old 2008 MacBook Pro, and there’s just a lot of accumulated crud on its SSD. A clean install gives you a fresh, efficient system, so I’m going to put myself through the hassle of doing one; now I’ve decided to do it, I’m actually, if tragically, a little excited about it. If you want to do the same, there are a few things you should think about before you begin, and since I’ve been putting together a guide to myself to make sure it’s as pain-free as possible, I thought I’d share and explain. If you think I’ve forgotten something, tweet me and I’ll amend this post.
Back up
Oh sweet lord, back up. Back up in multiple ways to multiple places; you know this, I’m sure. For my money, if you’re about to do a clean install, you should do a bootable backup just for it – in addition to whatever other backup system you have. This is because you can put it to one side as a snapshot of your system just before you did the clean install, and jump back to it instantly by booting from this dedicated backup in case there’s something you just didn’t anticipate. (Remember that while Intel Macs can boot from drives mounted over USB, PowerPC Macs need to boot over FireWire.) I use SuperDuper! to do these bootable clones, but the venerable CarbonCopyCloner or even the Restore tab of Disk Utility will do just as well. Once you’ve backed up, boot from that backup (hold ⌥ during startup to pick it) and confirm it’s working and that everything’s present and correct.
Anticipate problems
Get your Mac running as you would typically and then scrutinise it to look for things that you will need to recreate on your clean system – look along the Dock, in the menu bar, in the Services menu, and at what options you see when you right-click typical files in the Finder; if you’re being really thorough, look in the list of running services in Activity Monitor, since some things will be running ‘headless’ – in the background. You’re looking for things that need to be added to a clean system in order to make it work for you – but do also take this as an opportunity to ditch things you’re not really using, since this will mean a less bloated, more robust system.
Capture your current setup
One of the most annoying things in cleaning down a system is that your old one had grown familiar and comfortable over the years, and if you’re anything like me, using a fresh system is a bit like breaking in new shoes – it’s all very smart, but a bit uncomfortable. Your Dock’s in the wrong order but you can’t remember what the right order is. One way you could combat this is to identify and copy across loads of preference files, but I prefer to do it old-skool: taking a screenshot of my current system showing everything in place. Here’s mine, which shows the Finder sidebar as well as Dock and menus; you might need to capture different stuff, and remember that some apps let you export out the settings for your workspaces.
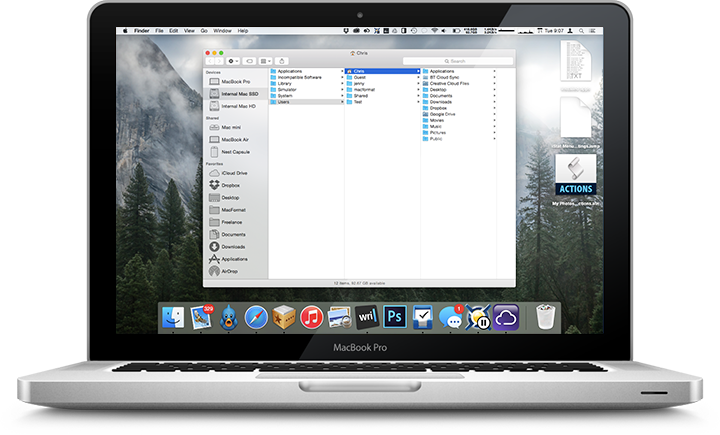 Oh, and, uh, it should go without saying, but make sure you copy this information off the Mac before you wipe it. Not that I’ve done similar in the past, you understand.
Save out important settings
iCloud and syncing in general can help with some of this these days, but it’s still worth thinking if you use apps which need particular data exporting out ahead of time. For me, the two biggies are the settings for iStat Menus (the first app I install on a new Mac) and some custom Actions I have built in Photoshop. Save ’em out, stash ’em somewhere safe.
Source all your software
Before you wipe a Mac, make sure you can reinstall all the apps you need. If your apps are all from the Mac App Store, great, since reinstalling them is a case of clicking a few buttons on your new system, but for everything else, make sure you have install discs or access to downloads, as well as serial numbers, all to hand. Although I’ll double-check, I should be fine, as I put disc images for big apps in a folder on my Drobo, and store serials in Wallet. It can be easy to forget what apps you had installed, so an easy way to remember is to go to Applications, ⌘A, ⌘C then ⌘V into a Plain Text document to quickly generate a list. (You might want to do the same for Utilities as well.) Again, though, don’t just unthinkingly reinstall everything – use this as an opportunity to ditch cruft.
Deauthorise
Some things on your Mac get authorised to a server, and usually you get a limited number of activations. So that your old system isn’t using up one of your precious activations, before you wipe it deauthorise it for each. For example, for me, I deauthorise my Mac to play my iTunes Store purchases and Audible audiobooks, and I deauthorise Creative Suite.
Set up your new system
You’re probably ready to go. Start up from an installer drive (see Dan Frakes’ handy guide on how to create a bootable Yosemite installer) then before you install, go to Disk Utility, erase your internal hard disk or SSD. Install, then step through the process of creating a new account. Once you’re logged in, there’s one more thing I would do before copying back data, reinstalling apps, and linking your new system to, say, cloud backup services: rename it. Go to System Preferences → Sharing and then change the Computer Name to something new; this means it will be clear which machine originated files in any sync system, and should reduce the potential for conflicts. Now: slowly, carefully, copy over your old data from the backup, and reinstall just what you want and need – and enjoy your fresh, nimble new system! If you’ve forgotten anything, reach for your backup; that’s what it’s for!
Again, tweet me if you think I’ve missed something important!